Posts tagged ‘recipe’
Gluten-Free Corned Beef and Cabbage Dinner
The following guest post is from NFCA volunteer Annette Marie of Best Life Gluten-Free.
Here we go! Make this for the whole family, those who are gluten-free as well as everyone else: Gluten-Free Corned Beef and Cabbage Dinner!
Here in the USA, we typically see Corned Beef Brisket sold in supermarkets just around St. Patrick’s Day, but some specialty markets will carry it all year round. So, if you’re spotting it during May or September, grab it & know you’re a lucky one! Make this dinner and savor the flavors many times over and over. It’s easy to prepare, don’t be intimidated by the time element. It mostly does all the work while it’s simmering along. Let’s get you started.
Gluten-Free Corned Beef and Cabbage Dinner

Make this dish and get ready for the compliments!
Serves 4 to 5
Prep time: 20 min.
Cook time: 3 hrs.
Ingredients:
- 2 to 2 ½ lbs. gluten-free corned beef brisket
- 2 garlic cloves, peeled and smashed.
- 3 carrots, peeled and sliced into big chunks; about 2 in. long
- 1 large yellow onion, sliced in quarters
- 5 potatoes, peeled of skin (I used 3 medium sized Yukon Golds and 2 medium sized Red Potatoes, just to have both flavors and tastes in there.)
- 1 cabbage, cut into quarters or fifths (Leave spine attached or it will fall apart while simmering.)
- 2 bay leaves
- 10 peppercorns (Leave whole, don’t crush)
- Dash of thyme
- 1 Tbsp. Salt
- Few parsley sprigs
- Water, enough to to cover meat well.
- Mustard (for serving at meal time as a garnish. A must for everyone I know!)
Directions:
(It’s easy, so please don’t be discouraged!)
- Remove meat from packaging and briefly rinse under water .
- Take a large pot or Dutch oven and place meat inside. Add enough water to cover it well. Don’t skimp on the water, since it will be simmering for a long time. Cover it by approximately 2 inches.
- Throw in (well, not literally,) the bay leaf, parsley, salt, peppercorns and thyme. Cover and bring to a boil. When you see it’s come to a boil, lower heat and simmer for 2 hrs. Occasionally, check to be sure it’s simmering on a light boil and after 1 hour, using 2 large spatulas or spider tool, gently turn over to reverse side. Be gentle. It’s getting very soft.
- After 2 hours, stick a fork or knife in the meat and it should be very tender and pierce right through. Using that spider tool or spatulas, remove to a large platter and cover meat with foil.
- Add all of the vegetables to that pot and simmer for ½ hour. Veggies will be getting nice and soft, soaking up the flavors of that “broth.”
- Re-position meat into the pot for another 15 minutes to reheat.
- Remove meat to a carving board and slice to the thickness you prefer.
- Serve on a large platter with the veggies along-side and provide your favorite type of mustard to accompany each bite. You can drizzle a little of the broth on top of the slices if you like. So good. Get ready for the compliments!
– Annette
Gluten Free Cranberry-Orange Scones
The following post is from National Foundation for Celiac Awareness (NFCA) volunteer Annette Marie of Best Life Gluten-Free.
I had no desserts or snacks on hand today, and for me, that’s a horrible situation! I have a tremendous sweet tooth. So…out came the measuring spoons, cups, and other essentials.
There are certain flavors that go so well together…and these two are a perfect example: Cranberry and Orange.
I had a Cranberry-Orange Scone that was commercially made, gluten-free of course, and loved those tastes together. So, rather than spend $5.00 on one (“gulp!”), I decided to experiment on a recipe at home. And you know what? It didn’t involve that much work or even that much time.
So, if you have the desire, and a little bit of time, try my scone recipe. And I’ll bet you can even change up the flavors once you’ve made this recipe and come up with something special that you’ll like just as much as I love these.
Gluten-Free Cranberry Orange Scones

Gluten-Free Cranberry Orange Scones
Ingredients:
- 2 cups All Purpose Gluten-Free Flour Blend (such as Arrowhead Mill), plus additional for dusting your board or surface.
- 1 tsp. xanthan gum (Omit if already added to flour blend)
- 1 stick cold sweet butter (8 Tbsp.) cut into small pieces. Keep cold until ready to begin adding.
- 1/3 cup granulated sugar
- ¼ tsp. salt
- 1 Tbsp. baking powder
- ¼ tsp. baking soda
- ½ cup milk
- ¼ cup heavy cream (If you like, use ¾ cup Half &Half instead of milk & cream)
- 1 egg1 tsp. gluten-free pure vanilla extract
- 1 tsp. orange juice- from a fresh orange
- 1 Tbsp. orange zest – from same orange of course.
- 1/3 cup cranberries – dried
- Small amount Demerara sugar for sprinkling on top.
Directions:
- Preheat oven to 400 degrees. Line your baking or cookie sheet with parchment paper. No need to grease or spray.
- In large bowl, place all dry ingredients. Mix by hand just to make sure they are all incorporated together. Add the zest and combine.
- Take out the cold butter and “cut in” to the dry ingredients with pastry cutter tool or forks. Don’t use mixer here.
- In another smaller bowl, hand blend the wet ingredients including the egg and orange juice.
- Add the wet to the bowl with the dry. If you use a hand mixer, don’t beat too much. Once it gets a little stiff, stop and use clean hands. Form 2 balls. It should be easy to do this, since the batter will stick. If you feel it’s really too dry and doesn’t “stick together,” add a drop or two more milk. But not a lot of additional milk.
- On the dusted surface, place the two balls and flatten into 2 discs. They should be about 7-8 inches wide.
- Brush top with a little bit of milk and sprinkle with Demerara sugar.
- Cut with a sharp knife into triangles and using a flat spatula, gently lift off board and place on the parchment paper on your baking sheet.
- Bake for about 10 to 12 minutes, or until light golden in color.
- Cool on the paper, and store in air-tight container when cooled. (Don’t cover while warm or moisture beads will form inside.)
This is really easy to do, and makes a great breakfast treat on a weekend morning! Actually, it’s a nice treat at any time of day!
– Annette

Annette Marie of Best Life Gluten-Free
Annette Marie of Best Life Gluten-Free
Annette is a native New Yorker, now living in New Jersey. Since she was diagnosed with celiac disease well after the age of 50, Annette has made it her mission to raise awareness in the hopes that others won’t have to live for years with unexplained symptoms as she did. Some of Annette’s recipes are inspired by traditional Italian recipes, but she adds other original gluten-free recipes to the mix. Her “semi-homemade” and from “scratch” recipes are meant for busy families eating gluten-free. For more of Annette’s gluten-free recipes, visit her blog at www.BestLifeGlutenFree.com.
Easy Gluten-Free Recipes for a Summer Block Party
I have three criteria for the perfect block party food:
1) It has to be handheld.
2) It has to be tasty.
3) It has to get people talking.
With those stipulations in mind, I embarked on creating two recipes – one savory, one sweet – for NFCA’s Virtual Summer Block Party. The only requirements were that I use Blue Diamond’s new Artisan Nut Thins and one of the many gluten-free products from Go Veggie! (I chose the dairy-free cream cheese alternative because it seemed the most versatile.)

Just a few simple ingredients made for delicious gluten-free block party snacks!
Products in hand, I proceeded to take a “Chopped!” approach and made my dishes using only the ingredients I could find in my kitchen. Since the whole point of the Summer Block Party is to help everyone feel more confident and included at food-centric social events, I decided to make my recipes not only gluten-free, but also vegetarian.
First up, I created a spin on stuffed tomatoes. I have looked at a number of stuffed tomato recipes online, but never have tried them myself. Some call for baking the tomato, but for this batch, I left the oven off. Instead, I crumbled up the Artisan Nut Thins and toasted them in a pan, which added a nutty flavor and crunch to each bite.
I’m not one for exact measures when creating recipes, so you’ll have to bear with me when I say just wing it on the amounts. Everyone has their preferred veggies-to-cream cheese ratio, and I tend to use more pepper than salt in my seasoning. So, customize it to your liking.
For the sweet dish, I first tried blending strawberries with the Go Veggie! Cream Cheese Alternative. What I didn’t anticipate was that the water in the strawberries would thin the cream cheese out too much. It was delicious, but didn’t have the heft that I was looking for in a cracker topping. My guess is that it would make a fantastic pie filling, especially if mixed with a gluten-free, dairy-free vanilla pudding. Chilling the mixture in the fridge also helps it set up.
In my second attempt, I opted for a deconstructed strawberry cheesecake. I mixed the cream cheese alternative with agave nectar, spread it on Artisan Nut Thins, and then topped it with balsamic glazed strawberries. This recipe earned a verbal declaration: “Winner!” For an even sweeter bite, I would recommend dusting the Artisan Nut Thins with some cinnamon and sugar and giving them a quick bake in the oven before adding the toppings. (Make sure they are completely cool so the cream cheese spread doesn’t get runny.)
If you ask me, these recipes offer more interest than the standard chips, salsa and fruit salad, but I’m eager to hear what you think. Invite the neighbors over, give these recipes a whirl, and let us know how it goes!
Stuffed Tomatoes with Gluten-Free Cracker Topping

Easy & delicious!
Gluten-Free Strawberry Cheesecake Bites

A simple, bite-sized dessert.
– Cheryl
Gluten-Free BBQ Shrimp with Lime Marinade
The following guest post is from NFCA volunteer Annette Marie of Best Life Gluten-Free.
I love jumbo shrimp and this is an easy way to have them on the barbecue, with just a few steps beforehand. After they’ve soaked up the marinade, just thread through skewers, or even place in one of those metal baskets for the grill.
The lime adds a great “tang”!
Gluten-Free BBQ Shrimp with Lime Marinade

Barbecue Shrimp with Lime Marinade
Ingredients:
- 1 lb. extra-jumbo shrimp (approx. 16 per lb.)
- 1 lime (you need the grated zest from it and all of the juice squeezed from it)
- ½ Tbsp. finely diced poblano pepper (You can freeze the remaining pepper for the future)
- 3 Tbsp. light extra virgin olive oil
- Pinch of fresh ground black pepper
- Pinch of salt (Sea salt preferred)
- 1 tsp. fresh parsley flakes, chopped in small pieces
Directions:
- First, peel and devein the shrimp, trying your best to leave the tails on.
- In a medium bowl combine all of the remaining ingredients, stirring well. Add the shrimp and toss so they’re coated all around.
- Refrigerate for 30 minutes.
- Thread on skewers (or use a metal barbecue basket that will allow you to rotate the shrimp so all sides get cooked). If using wooden skewers, be sure to soak in water before threading, so they don’t burn on the grill.
- Place on a hot grill, and grill for about 3 minutes on each side, until turning pink. A lovely side dish is a saffron rice, but whichever side dish you choose, these are great!
For tips on safe gluten-free grilling, check out the Gluten-Free Summer Safety Tips blog series from the National Foundation for Celiac Awareness.
Annette Marie of Best Life Gluten-Free
Annette Marie of Best Life Gluten-Free
Annette is a native New Yorker, now living in New Jersey. Since she was diagnosed with celiac disease well after the age of 50, Annette has made it her mission to raise awareness in the hopes that others won’t have to live for years with unexplained symptoms as she did. Some of Annette’s recipes are inspired by traditional Italian recipes, but she adds other original gluten-free recipes to the mix. Her “semi-homemade” and from “scratch” recipes are meant for busy families eating gluten-free. For more of Annette’s gluten-free recipes, visit her blog at www.BestLifeGlutenFree.com.
Stuffed Zucchini in Tomato Sauce
There is a local farmers’ market near me in New Jersey that carries these little zucchinis that are a different shape from those you typically see: these are round! As soon as you see ’em, you think “I’m gonna stuff them!” They are probably picked early, though that’s only my guess, since I’m not familiar with the manner in which they‘re grown or harvested. I’ve only grown the usual zucchini which are long and thin, of course.
Now, if this recipe appeals to you and you aren’t able to find these round ones, you can certainly stuff the long shaped zucchini. Slice them horizontally and using a spoon, scoop or scrape out some filling creating an almost boat-like appearance. Save the filling to use in the stuffing as I’ll describe later.
Don’t be turned off by the steps involved. It really is worth the effort!
Stuffed Zucchini in Tomato Sauce

Stuffed Zucchini in Tomato Sauce
Ingredients:
- A few fresh zucchini ( I used 3 for this recipe.)
- Save the filling that’s removed, as directed, and dice it.
- ¼ cup vegetable oil
- ½ shallot- diced
- 1 cup Italian-Flavored Bread Crumbs (Gillian’s Gluten-free are my favorite)
- ¼ cup Pecorino Romano grated cheese (or Parmesan grated is fine too)
- Dash of salt and freshly ground black pepper
- 4 small button mushrooms or baby crimini‘s – diced
- 1/5 of a red bell pepper – diced.
- Dash of garlic powder, not garlic salt
Sauce Ingredients:
- 1 can (28 0z.) crushed tomatoes
- 2 Tbsp. vegetable oil or extra virgin olive oil
- 4 fresh basil leaves – slivered or chopped
- 1 garlic clove- minced
- 1 Tbsp. minced onion
- Salt and pepper to taste (I use a dash of each)
Directions:
- First, wash the zucchini and then cut off the top, about ¼ from the top, trying to create a little “hat.” Using a sharp paring knife, remove some of the center to make space for stuffing. We’ve included lots of photos for this recipe to guide you. You need to leave enough zucchini inside though to provide some body to stand up.
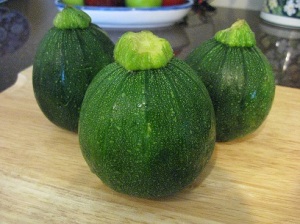
The raw zucchini.
- Save the filling you cut out. We’ll incorporate it into the other items for the filling.
- Place the hollow zucchini in a saucepan of water, but don’t submerge them. Water should only meet the zucchini half way up.

Be sure to not submerge to zucchini in water!
- Cover pot. Simmer them for approximately 15 minutes, but keep carefully pressing the side to see if they are softening. Do not allow them to become mushy. We need some “body” in order to handle and stuff without falling apart.
- Using a ladle, gently remove from water and allow to cool on paper towel.
- Now make the filling:
- In a skillet, add the oil and when heated saute the shallot and then garlic for a short time. Don’t allow either to brown. While they are doing this, mix the bread crumbs and grated cheese in a small bowl. Add the Salt & Pepper to this and combine. Set aside.
- Into the skillet with that onion & garlic, now add the chopped zucchini you removed from the centers, and the small amount of red pepper. Saute for 5 minutes, stirring frequently. Add the diced mushrooms and do the same.
- Lastly, stir in the bread crumb mixture and incorporate into the vegetables.
- Remove to a bowl or dish to cool slightly-just long enough to be able to handle.
- Take the cooled, empty zucchini and “stuff!” Use a teaspoon or whatever is easy for you to manage and fill the zucchini as in the photo.(I know this seems like a lot, but it’s really an easy dish and worth it! )

Looking good, right?
- In a skillet that has a cover, place 2 tbsp Oil, and when warmed, saute the garlic and onion. Don’t brown, juts allow to become translucent.
- Add the can of crushed tomatoes and basil, a dash of salt and pepper. Stir well.
- Lastly, place the filled zucchini in the sauce, and over a low heat, cover pan and simmer for approximately 30 minutes, stirring the sauce all around them frequently, making sure they don’t stick to bottom of pan. The zucchini stay in an upright position during the cooking. Never tilt over. I put the “hats” we cut off at the beginning, in the sauce as well to soften them. The hats aren’t essential to the recipe, they just look cute! LOL!


Serve as a side dish with any entree, whether the meal is Italian or not…doesn’t matter. We love this with some crusty bread for sauce-dipping!
Hope you’ll try this! And let me know if you do.
– Annette Marie
Annette Marie of Best Life Gluten-Free
Annette Marie of Best Life Gluten-Free
Annette is a native New Yorker, now living in New Jersey. Since she was diagnosed with celiac disease well after the age of 50, Annette has made it her mission to raise awareness in the hopes that others won’t have to live for years with unexplained symptoms as she did. Some of Annette’s recipes are inspired by traditional Italian recipes, but she adds other original gluten-free recipes to the mix. Her “semi-homemade” and from “scratch” recipes are meant for busy families eating gluten-free. For more of Annette’s gluten-free recipes, visit her blog at www.BestLifeGlutenFree.com.
A Personal Celiac Disease Story and Gluten-Free Recipe
Introducing Annette Marie of Best Life Gluten-Free! Annette will be sharing her gluten-free recipes here on the National Foundation for Celiac Awareness (NFCA) staff blog. Read on to learn more about the cook behind the gluten-free recipes at www.BestLifeGlutenFree.com.
My name is Annette and I live in the “Garden State,” the lovely state of New Jersey! I was actually a New Yorker most of my life, growing up there and learning to cook and bake at the hip of my Italian-American Mom. (I must admit that when I was twelve, I wasn’t too happy to forgo the soda shop after school in order to learn how to make marinara sauce!) But looking back, I’m glad she did it.
Like many others, I was diagnosed with Celiac Disease after much suffering, pain and anguish, wondering what could be wrong with me. As a kid, we visited the doctor so often that when he saw me he’d exclaim, “Well, it’s the belly-ache kid!” Later in my life I had 3 ulcers and always suffered with stomach issues in one way or another.
For years I was embarrassed, frustrated and down-right mad! Why couldn’t they fix what was wrong? However, unlike some people with celiac disease, I wasn’t diagnosed as a child…nor as a teen…nor even as a young woman. Mine was diagnosed well after 50! Talk about a medical mystery!
It was so severe that I was unable to make a 30 minute drive without plotting the route and discovering if there was a shop with a restroom nearby.
Thank God for the gastroenterologists, who have been caring and supportive, have provided information, guidance and so much more. Yes, it was difficult the first few months, but I took it on as a challenge to be met.
That’s why I’m really hoping to “Pay-it-Forward” by helping anyone who may need some guidance or reassurance. My recipes are both “semi-homemade” and “scratch,” and if I can provide photos along with as much description as I can to help you get cooking gluten-free, then that’s what I’ll do.
My biggest message to people with celiac disease or non-celiac gluten sensitivity (NCGS) is, please don’t feel isolated. More and more, it seems as if gluten intolerance and celiac disease are coming to the forefront. And thank goodness for strides being made in our behalf by organizations like the National Foundation for Celiac Awareness.
Here is just one of my gluten-free recipes that I’m so excited to share with you!
Cheese-Filled Coffee Cake

Ingredients:
Cream Cheese Filling:
- 6 oz. cream cheese – room temperature
- ¼ cup granulated sugar
- ½ tsp. lemon juice
Dough Ingredients:
- 1 ½ cups Gluten-Free Bisquick
- 2 large eggs
- 1/3 cup milk (I used Lactaid 2%, but any is fine)
- ¼ cup butter – softened, room temp is fine)
- 1 tsp. gluten-free pure vanilla extract
- 1/3 cup granulated sugar
Crumb Topping Ingredients:
- ¼ cup light brown sugar
- ¼ cup softened butter – room temp
- 1/3 cup all-purpose gluten-free flour blend (Bob’s Red Mill is fine.)
- Small amount of confectioner’s sugar for dusting on top when it’s done.
Directions:
- Preheat the oven to 375 degrees. Generously grease a round 9 in. cake pan. (I used margarine)
- Well, you’ve greased the pan liberally, so set it aside. First, mix the filling in a small bowl and set aside.
- In a large bowl, mix the butter, milk, eggs, vanilla and sugar. Gradually add the flour and mix until well combined. Spread about a little more than half of the batter in the bottom of the pan.
- Next put the cream cheese filling on top and try to spread around. (It may be difficult, but using the back of a tablespoon works well.)
- Lastly, put the remainder of the dough batter on top.
- In a small bowl, using a pastry blender tool or 2 forks, combine the topping ingredients until it resembles crumbs. Sprinkle over the batter in the pan.
- Bake for about 25 minutes. Ovens vary so take a peek after 20 minutes. A tooth pick inserted into it should come out clean and dry when done.
- Cool well before dusting the top with sifted confectioner’s sugar, if you like. After cooling, be sure to keep covered for freshness.
That’s it!
About Annette Marie

Annette is a native New Yorker, now living in New Jersey. Since she was diagnosed with celiac disease well after the age of 50, Annette has made it her mission to raise awareness in the hopes that others won’t have to live for years with unexplained symptoms as she did. Some of Annette’s recipes are inspired by traditional Italian recipes, but she adds other original gluten-free recipes to the mix. Her “semi-homemade” and from “scratch” recipes are meant for busy families eating gluten-free. For more of Annette’s gluten-free recipes, visit her blog at www.BestLifeGlutenFree.com.
5 Ways to Get Your Kid Excited About the Gluten-Free Diet
Starting a gluten-free diet can be challenging for anyone, but kids can have an especially tough time when faced with social situations. It’s hard to tell your little one they can’t have the cake at their friend’s birthday party or that Play-Doh is off limits. With a little imagination and creativity, though, you can get your child excited about the gluten-free diet.
Set Aside Time to Cook Together
Dedicate a few hours a week to trying new gluten-free recipes with your child. The recipes don’t have to be complicated or take a long time to make. Not only will this give you some quality one-on-one time with your little one, but you’ll also teach them how to manage their own gluten-free diet and identify possible gluten sources.

Look for this logo on Kids Central to get started with your gluten-free creations!
Visit NFCA’s Kids Central to get kid-friendly recipe ideas. Kids Central is also home to the archived webinar, Cooking with Kids, featuring ideas and tips from Jessica Hale of Gluten Freeda.
Get Them Involved
Depending on how old your child is, they might be embarrassed about the gluten-free diet or having special dietary needs. Get them talking about celiac disease or non-celiac gluten sensitivity and help them meet other gluten-free kids. Social networking sites can help them connect with their peers, and you might even get a few new gluten-free recipe ideas from other parents. Miranda Jade Turbin shared tips for social networking in NFCA’s September e-newsletter.

Social media offers lots of opportunities for your child to connect with other gluten-free kids.
In-person meet-ups can be beneficial for kids because they give them a chance to meet others on a lifelong gluten-free diet. Groups like Raising Our Celiac Kids (R.O.C.K.) host meetings and activities across the country. They’re another great place to get activity ideas.
You can get them talking about the gluten-free diet through NFCA’s Awareness All-Stars fundraiser. Awareness All-Stars gives kids the opportunity to share their experience with celiac and help raise funds to support NFCA’s free programs and services. Plus, every All-Star earns prizes for participating and the top 3 fundraisers (we call them MVPs) get an extra special gluten-free prize.
Gluten-Free Show and Tell
Many kids have special show-and-tell days at school. Why not send them to class with delicious gluten-free cookies or cupcakes to share with their classmates? This will give them a chance to tell all of their classmates about celiac disease and show them how a gluten-free diet can still be tasty. Plus, this lets kids become more comfortable with talking about celiac disease and their dietary needs.

You can get the recipe for these ChocoCoconut Cookies from registered dietitian Rachel Begun on Kids Central.
Arts & Crafts
Traditional Play-Doh contains gluten, but that doesn’t mean your gluten-free kid can’t enjoy the fun. Spend a Saturday afternoon making gluten-free Play-Doh with them. You’ll be giving them a safe alternative while showing them trying out new things can be fun! Check out this recipe for gluten-free Play-Doh from Parents Magazine.
Give Them a “Pep Talk”

Look for this logo on Kids Central to find the Pep Talks section or click on the link below.
Kids Central has a section dedicated to Pep Talks, which features tips from gluten-free kids and NFCA’s staff and Athletes for Awareness. The Pep Talks cover everything from “Being Gluten-Free and Confident” to “Awesome Things Done by Gluten-Free Kids.” In short 5-tip segments, your kid is bound to get a major confidence boost from Pep Talks!
So how do you help your child maintain a positive attitude about the gluten-free diet?
– Alicia
5 Tips for Baking Gluten-Free From Scratch
[You’re ready to bake from scratch, but don’t know where to start. Fear not! Shauna James Ahern, better known as Gluten-Free Girl, is here to share her tips and tricks for baking delicious gluten-free goods.]
1. Let go of your expectations.
2. You have to combine flours.

3. Learn to bake by weight.
4. Play.
5. Psst! Here’s a secret. Most baked goods are actually better without gluten.
I Took the Alternative Appetites Cooking Challenge. Will You?
How many times have you watched a cooking video and didn’t try the recipe? Guilty. I’ve been known to watch my share of The Food Network, “Lidia’s Italy” and YouTube cooking shows only to admire, sigh, and move on to the next episode.
Time to change that.
When we premiered the latest videos in our Alternative Appetites series, I was determined to make one of the gluten-free recipes at home. I’ve made several recipes from the show before (Eggplant Casserole, anyone?). This time, the Amaranth and Black Bean Salad, a recipe sponsored by The Hain Celestial Group, Inc., caught my eye.

Ingredients gathered. Ready to cook!
Let me start off by saying, this recipe makes a big batch. So big that is nearly overflowed my largest mixing bowl. If you’re sharing with a friend, it’s a good amount to last you a few days. If you’re single, I’d recommend halving the recipe.
The trick to this recipe was cooking the amaranth properly. Like many of you, I’ve just discovered the grain, so I’m still finding that point where it goes from undercooked to just right. Once the amaranth was done, I popped it into the fridge for a quick chill.

This looks like a small amount, but it goes a long way.
While the amaranth was cooling, I prepped the vegetables. It took some time, but shortcuts like using canned black beans and corn helped. I also took the lazy route and used a jar of roasted red peppers, but I highly recommend roasting your own (I learned a snappy way to do it from this Alternative Appetites video).

Bring on the veggies.
Then it was on to the vinaigrette, which was done in a matter of seconds. I forgot to pick up mint (it’s always something), so I threw in a bit of tarragon and chives just to freshen it up.
Finally, it was time to assemble – all of which I completed within the length of a commercial break. Then, the first bite.

All done!
You ever get that feeling when you eat something that’s filling, yet light and refreshing at the same time? Well, that’s what I got when I ate this. I consider it my mouth’s way of patting me on the back for doing my body good. The beans, tomatoes, walnuts and grains offer different textures, while the peppers and onions lend strong flavors. In fact, if you’re not a fan of red onion, I’d suggest using only ¼ of an onion. The vinaigrette and corn layer in sweetness, though I could have done with a little less dressing.

What's a food post without a close-up?
The best thing about this recipe is how versatile it is. You could easily add crumbled feta cheese or swap in sliced almonds for the walnuts. I added sliced beets when I scooped some out for work the next day.
So, now that you’ve read my experience, I want you to share yours. Try one of the recipes from the videos posted at www.celiaccentral.org/cookingvideos, then make sure to click through the video and leave a comment on the video on YouTube.
If you have a blog, share your experience just like I did and we’ll enter you in the Alternative Appetites Cooking Challenge. Just email cmcevoy@celiaccentral.org with the link to your post. (Cooking wins and fails welcome!)
– Cheryl
Related Content:
A Gluten-Free Holiday Treat, No Baking Required
I’m always prepared to bring an appetizer, salad or main dish to social gatherings and holiday functions. Like many with celiac disease, I quickly learned that if I wanted to eat a safe gluten-free meal, it was up to me to tote along at least one item I knew I could eat.
But dessert? Despite my sweet tooth, more often than not I have opted to forgo dessert simply because baking and I are not friends. So fruit has served as my go-to pick, and the nutritional benefits are always a plus. Alas, sometimes a fruit salad, no matter how fresh the ingredients, just won’t cut it. This Christmas, I wanted to join my family at the dessert table with something more substantial than pineapple and berries, even if topped with whipped cream.
Enter these no-bake coconut balls.

Gluten-Free No Bake Coconut Balls
I’m sure you can guess that a recipe with minimal ingredients and without an actual “baking” process were both requirements. Fortunately, I stumbled across this simple recipe while performing the perfunctory Google search: No Bake Coconut Balls
The recipe called for nut butter plus chocolate chips or nuts of your choosing, but I opted for a combination of the two. My secret ingredient? Justin’s Nut Butter. This brand has been a pantry staple of mine for the past 2 years so I knew that their Chocolate Peanut Butter flavor was delicious. (If you are not already familiar with their line of nut butters, please head to your local grocery store immediately).

All you need for a delicious gluten-free dessert.
Not only did they fulfill my sweet tooth, but my family was impressed too. Who said you need flour to “bake” Christmas cookies?
– Kristin
Related Content:

