Posts tagged ‘recipes’
Gluten-Free Corned Beef and Cabbage Dinner
The following guest post is from NFCA volunteer Annette Marie of Best Life Gluten-Free.
Here we go! Make this for the whole family, those who are gluten-free as well as everyone else: Gluten-Free Corned Beef and Cabbage Dinner!
Here in the USA, we typically see Corned Beef Brisket sold in supermarkets just around St. Patrick’s Day, but some specialty markets will carry it all year round. So, if you’re spotting it during May or September, grab it & know you’re a lucky one! Make this dinner and savor the flavors many times over and over. It’s easy to prepare, don’t be intimidated by the time element. It mostly does all the work while it’s simmering along. Let’s get you started.
Gluten-Free Corned Beef and Cabbage Dinner

Make this dish and get ready for the compliments!
Serves 4 to 5
Prep time: 20 min.
Cook time: 3 hrs.
Ingredients:
- 2 to 2 ½ lbs. gluten-free corned beef brisket
- 2 garlic cloves, peeled and smashed.
- 3 carrots, peeled and sliced into big chunks; about 2 in. long
- 1 large yellow onion, sliced in quarters
- 5 potatoes, peeled of skin (I used 3 medium sized Yukon Golds and 2 medium sized Red Potatoes, just to have both flavors and tastes in there.)
- 1 cabbage, cut into quarters or fifths (Leave spine attached or it will fall apart while simmering.)
- 2 bay leaves
- 10 peppercorns (Leave whole, don’t crush)
- Dash of thyme
- 1 Tbsp. Salt
- Few parsley sprigs
- Water, enough to to cover meat well.
- Mustard (for serving at meal time as a garnish. A must for everyone I know!)
Directions:
(It’s easy, so please don’t be discouraged!)
- Remove meat from packaging and briefly rinse under water .
- Take a large pot or Dutch oven and place meat inside. Add enough water to cover it well. Don’t skimp on the water, since it will be simmering for a long time. Cover it by approximately 2 inches.
- Throw in (well, not literally,) the bay leaf, parsley, salt, peppercorns and thyme. Cover and bring to a boil. When you see it’s come to a boil, lower heat and simmer for 2 hrs. Occasionally, check to be sure it’s simmering on a light boil and after 1 hour, using 2 large spatulas or spider tool, gently turn over to reverse side. Be gentle. It’s getting very soft.
- After 2 hours, stick a fork or knife in the meat and it should be very tender and pierce right through. Using that spider tool or spatulas, remove to a large platter and cover meat with foil.
- Add all of the vegetables to that pot and simmer for ½ hour. Veggies will be getting nice and soft, soaking up the flavors of that “broth.”
- Re-position meat into the pot for another 15 minutes to reheat.
- Remove meat to a carving board and slice to the thickness you prefer.
- Serve on a large platter with the veggies along-side and provide your favorite type of mustard to accompany each bite. You can drizzle a little of the broth on top of the slices if you like. So good. Get ready for the compliments!
– Annette
Easy Gluten-Free Recipes for a Summer Block Party
I have three criteria for the perfect block party food:
1) It has to be handheld.
2) It has to be tasty.
3) It has to get people talking.
With those stipulations in mind, I embarked on creating two recipes – one savory, one sweet – for NFCA’s Virtual Summer Block Party. The only requirements were that I use Blue Diamond’s new Artisan Nut Thins and one of the many gluten-free products from Go Veggie! (I chose the dairy-free cream cheese alternative because it seemed the most versatile.)

Just a few simple ingredients made for delicious gluten-free block party snacks!
Products in hand, I proceeded to take a “Chopped!” approach and made my dishes using only the ingredients I could find in my kitchen. Since the whole point of the Summer Block Party is to help everyone feel more confident and included at food-centric social events, I decided to make my recipes not only gluten-free, but also vegetarian.
First up, I created a spin on stuffed tomatoes. I have looked at a number of stuffed tomato recipes online, but never have tried them myself. Some call for baking the tomato, but for this batch, I left the oven off. Instead, I crumbled up the Artisan Nut Thins and toasted them in a pan, which added a nutty flavor and crunch to each bite.
I’m not one for exact measures when creating recipes, so you’ll have to bear with me when I say just wing it on the amounts. Everyone has their preferred veggies-to-cream cheese ratio, and I tend to use more pepper than salt in my seasoning. So, customize it to your liking.
For the sweet dish, I first tried blending strawberries with the Go Veggie! Cream Cheese Alternative. What I didn’t anticipate was that the water in the strawberries would thin the cream cheese out too much. It was delicious, but didn’t have the heft that I was looking for in a cracker topping. My guess is that it would make a fantastic pie filling, especially if mixed with a gluten-free, dairy-free vanilla pudding. Chilling the mixture in the fridge also helps it set up.
In my second attempt, I opted for a deconstructed strawberry cheesecake. I mixed the cream cheese alternative with agave nectar, spread it on Artisan Nut Thins, and then topped it with balsamic glazed strawberries. This recipe earned a verbal declaration: “Winner!” For an even sweeter bite, I would recommend dusting the Artisan Nut Thins with some cinnamon and sugar and giving them a quick bake in the oven before adding the toppings. (Make sure they are completely cool so the cream cheese spread doesn’t get runny.)
If you ask me, these recipes offer more interest than the standard chips, salsa and fruit salad, but I’m eager to hear what you think. Invite the neighbors over, give these recipes a whirl, and let us know how it goes!
Stuffed Tomatoes with Gluten-Free Cracker Topping

Easy & delicious!
Gluten-Free Strawberry Cheesecake Bites

A simple, bite-sized dessert.
– Cheryl
Gluten-Free Pasta in Bolognese Sauce
The following recipe is from National Foundation for Celiac Awareness (NFCA) Volunteer Annette Marie of Best Life Gluten-Free.
Would you like to surprise Mom with dinner on Mother’s Day or on any day, for that matter? Why not an Italian dinner that you can easily make from scratch?
Bolognese sauce is pretty easy and this recipe shortens the time to 1 hour. There are various recipes out there, some simmering the sauce for 2+ hours, but you can achieve similar results with this one, which shortens that by half.
Bolognese sauce also varies in which meat you choose to use. Some recipes call for ½ ground beef and ½ ground veal. I’ll leave that up to you.
Here I used just ground beef, so feel free to follow this exactly or combine the two. Just use half as much of each, if you combine them.
I also don’t use “naked” ground meat. I prepare the ground meat as I would for meatballs. Then instead of rolling into a ball, you just leave it un-shaped and brown it in your saucepan, so its result is a loose meat within the sauce.
Please let me know if you prepare this and how you like it! Bon appetito!
Gluten-Free Pasta in Bolognese Sauce

This dish will taste like you slaved in the kitchen for hours, but no one has to know this recipe cuts your cooking time in half!
Ingredients:
Meat Preparation:
- 2 Tbsp. vegetable oil
- 1 lb. ground beef
- 1 egg
- ¼ cup Italian-flavored gluten-free bread crumbs- (I like Gillian’s)
- ¼ cup grated Italian cheese
- 1 slice of white gluten-free sliced bread that has soaked in small amount of milk. (You will use the center of the slice, the white part, and gently squeeze out the milk. It’s ok if it’s still wet, no need to get it too dry. It adds moisture.)
- Dash of salt & pepper
Sauce Ingredients:
- 2 Tbsp. olive oil
- 1 small onion- minced
- 2 garlic cloves- minced
- 1 carrot- shredded. (Use a food processor for speedier preparation or shred by hand.)
- 1 celery rib, minus the green leafy end – minced or shredded in a food processor
- The above-prepared ground meat
- 1 large can crushed tomatoes
- 3 basil leaves, chopped
- Salt & pepper to taste
- Grated Italian cheese to garnish when ready to serve.
Directions:
- First, prepare the ground meat, as you would for meatballs. (It’s easy! Place all of those ingredients in a large bowl, use clean hands and combine well. Don’t form meatballs, just leave it as combined.)
- Take a frying pan and brown the meat in the hot vegetable oil, loosely stirring as you brown it, and turning over to brown all parts. Drain off any fat and oil and then set aside until it’s time to add to the saucepan.
- In a large saucepot, place the olive oil and when hot, sauté the onion and garlic. Don’t allow to brown. After onion is translucent, add the shredded carrot and celery and sauté for about 4 – 5 minutes.
- Now, add the browned meat, and stir into the vegetables.
- Add the can of Crushed Tomatoes, the basil ,salt & pepper.Here’s a view of the simmering sauce:
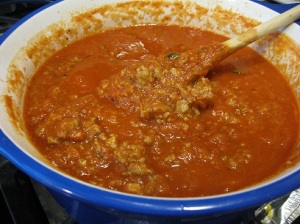
Your Bolognese sauce should start to look something like this!
- Cover and begin to cook on a low-medium heat. Keep checking. When it’s simmering, reduce to low and simmer for 45 minutes. Be sure to stir frequently and touch the bottom of the pot when you stir! This isn’t something you can set and forget. It will stick to the bottom and burn if left unattended for more than 10 minutes. So, if you feel you may forget to stir, set a timer for every ten minutes so your results will be the best!
- When it’s done, you can remove from heat and leave covered until your gluten-free pasta of choice is cooked.
- Boil the pasta until “al dente”. Drain pasta and place it in a large bowl so you can pour this yummy sauce on top and fold into the pasta to coat well.
- Add grated Italian cheese on top and enjoy!!

About Annette Marie

Annette Marie of Best Life Gluten-Free
Annette is a native New Yorker, now living in New Jersey. Since she was diagnosed with celiac disease well after the age of 50, Annette has made it her mission to raise awareness in the hopes that others won’t have to live for years with unexplained symptoms as she did. Some of Annette’s recipes are inspired by traditional Italian recipes, but she adds other original gluten-free recipes to the mix. Her “semi-homemade” and from “scratch” recipes are meant for busy families eating gluten-free. For more of Annette’s gluten-free recipes, visit her blog at www.BestLifeGlutenFree.com.
Gluten-Free Chicken with Broccoli over Rice
The following guest post and recipe are from National Foundation for Celiac Awareness (NFCA) volunteer, Annette Marie of Best Life Gluten-Free.
I am a former New Yorker, where there are more restaurants than you can shake a stick at! And quite often we enjoyed frequenting a Chinese place serving both Sechuan and Cantonese dishes, with all of the various tastes that just make your mouth water. So, when I wanted something similar, (don’t get me wrong-I’m not that familiar with Chinese cooking, after all, I’m Italian-American!) I fiddled around until I was happy with this dish.
This is a really quick chicken recipe that’s a one-dish meal, ready in about 30 to 40 minutes. And with the warm weather months ahead, that’s perfect for supper after a day outside enjoying yourself!
The trick to this recipe? Cook the white rice on one burner while the main dish is going on a second. Then everything’s ready at the same time.
Gluten-Free Chicken with Broccoli over Rice

Gluten-Free Chicken with Broccoli on Rice
Ingredients:
- White rice (Cook as directed, amount is per your needs)
- 6 or 7 chicken tenderloins, cut in half on diagonal
- 2 cups broccoli florets, washed and stems removed.
- 2 scallions sliced, but do not use the last 2 inches of greenest ends
- ½ cup Extra Virgin Olive Oil
- 2 Tbsp. butter
- ½ lb ( or more if you prefer) sugar snap peas, washed
- 1 cup gluten-free chicken broth
- 1 Tbsp. Bragg’s Liquid Aminos (Natural Soy Sauce Alternative)
- Dash of salt & pepper
- ¼ tsp. garlic powder
- 1 tsp. fresh lemon juice
- 2 Tbsp. cornstarch
Directions:
- Put up the rice, as we said, to be cooking while you’re making the chicken-broccoli dish.
- In large skillet, heat the olive oil and butter. When melted, saute the chicken tenders on a low to medium heat until there’s a golden tinge and there’s some golden-brown bits in the pan from the butter.
- Remove chicken and place on a plate, but keep the butter residue in the pan.
- In the butter residue, saute the scallions first, then add the peas and broccoli. Saute for about 3-4 minutes until starting to get a golden color.
- Add the broth, spices, amino liquid, and cover pan.
- Simmer on low for about 15 minutes.
- Remove cover and pour out about ½ cup of liquid into a measuring cup or small bowl.
- Add the cornstarch and hand-blend until combined.
- Add to the skillet and replace pan on low heat. Cover and heat for another 5-7 minutes until it only thickens a little. You should have a gravy-like liquid now. Shut heat.
The rice should be done and ready for your plate!
Quick! One-Dish! Ready to go!!
Enjoy!
– Annette Marie
About Annette Marie
Annette is a native New Yorker, now living in New Jersey. Since she was diagnosed with celiac disease well after the age of 50, Annette has made it her mission to raise awareness in the hopes that others won’t have to live for years with unexplained symptoms as she did. Some of Annette’s recipes are inspired by traditional Italian recipes, but she adds other original gluten-free recipes to the mix. Her “semi-homemade” and from “scratch” recipes are meant for busy families eating gluten-free. For more of Annette’s gluten-free recipes, visit her blog at www.BestLifeGlutenFree.com.
A Personal Celiac Disease Story and Gluten-Free Recipe
Introducing Annette Marie of Best Life Gluten-Free! Annette will be sharing her gluten-free recipes here on the National Foundation for Celiac Awareness (NFCA) staff blog. Read on to learn more about the cook behind the gluten-free recipes at www.BestLifeGlutenFree.com.
My name is Annette and I live in the “Garden State,” the lovely state of New Jersey! I was actually a New Yorker most of my life, growing up there and learning to cook and bake at the hip of my Italian-American Mom. (I must admit that when I was twelve, I wasn’t too happy to forgo the soda shop after school in order to learn how to make marinara sauce!) But looking back, I’m glad she did it.
Like many others, I was diagnosed with Celiac Disease after much suffering, pain and anguish, wondering what could be wrong with me. As a kid, we visited the doctor so often that when he saw me he’d exclaim, “Well, it’s the belly-ache kid!” Later in my life I had 3 ulcers and always suffered with stomach issues in one way or another.
For years I was embarrassed, frustrated and down-right mad! Why couldn’t they fix what was wrong? However, unlike some people with celiac disease, I wasn’t diagnosed as a child…nor as a teen…nor even as a young woman. Mine was diagnosed well after 50! Talk about a medical mystery!
It was so severe that I was unable to make a 30 minute drive without plotting the route and discovering if there was a shop with a restroom nearby.
Thank God for the gastroenterologists, who have been caring and supportive, have provided information, guidance and so much more. Yes, it was difficult the first few months, but I took it on as a challenge to be met.
That’s why I’m really hoping to “Pay-it-Forward” by helping anyone who may need some guidance or reassurance. My recipes are both “semi-homemade” and “scratch,” and if I can provide photos along with as much description as I can to help you get cooking gluten-free, then that’s what I’ll do.
My biggest message to people with celiac disease or non-celiac gluten sensitivity (NCGS) is, please don’t feel isolated. More and more, it seems as if gluten intolerance and celiac disease are coming to the forefront. And thank goodness for strides being made in our behalf by organizations like the National Foundation for Celiac Awareness.
Here is just one of my gluten-free recipes that I’m so excited to share with you!
Cheese-Filled Coffee Cake

Ingredients:
Cream Cheese Filling:
- 6 oz. cream cheese – room temperature
- ¼ cup granulated sugar
- ½ tsp. lemon juice
Dough Ingredients:
- 1 ½ cups Gluten-Free Bisquick
- 2 large eggs
- 1/3 cup milk (I used Lactaid 2%, but any is fine)
- ¼ cup butter – softened, room temp is fine)
- 1 tsp. gluten-free pure vanilla extract
- 1/3 cup granulated sugar
Crumb Topping Ingredients:
- ¼ cup light brown sugar
- ¼ cup softened butter – room temp
- 1/3 cup all-purpose gluten-free flour blend (Bob’s Red Mill is fine.)
- Small amount of confectioner’s sugar for dusting on top when it’s done.
Directions:
- Preheat the oven to 375 degrees. Generously grease a round 9 in. cake pan. (I used margarine)
- Well, you’ve greased the pan liberally, so set it aside. First, mix the filling in a small bowl and set aside.
- In a large bowl, mix the butter, milk, eggs, vanilla and sugar. Gradually add the flour and mix until well combined. Spread about a little more than half of the batter in the bottom of the pan.
- Next put the cream cheese filling on top and try to spread around. (It may be difficult, but using the back of a tablespoon works well.)
- Lastly, put the remainder of the dough batter on top.
- In a small bowl, using a pastry blender tool or 2 forks, combine the topping ingredients until it resembles crumbs. Sprinkle over the batter in the pan.
- Bake for about 25 minutes. Ovens vary so take a peek after 20 minutes. A tooth pick inserted into it should come out clean and dry when done.
- Cool well before dusting the top with sifted confectioner’s sugar, if you like. After cooling, be sure to keep covered for freshness.
That’s it!
About Annette Marie

Annette is a native New Yorker, now living in New Jersey. Since she was diagnosed with celiac disease well after the age of 50, Annette has made it her mission to raise awareness in the hopes that others won’t have to live for years with unexplained symptoms as she did. Some of Annette’s recipes are inspired by traditional Italian recipes, but she adds other original gluten-free recipes to the mix. Her “semi-homemade” and from “scratch” recipes are meant for busy families eating gluten-free. For more of Annette’s gluten-free recipes, visit her blog at www.BestLifeGlutenFree.com.
Has a Special Someone Cooked Gluten-Free for You?
When I first started working at the National Foundation for Celiac Awareness (NFCA), I was terrified to cook for the team. I was still learning about the gluten-free diet, and there were two things I knew for sure: 1) There is a serious need to keep gluten-free food from getting contaminated; and 2) Avoiding that contamination can be challenging, especially when you have three gluten-eating roommates at home. So, I avoided making any offers to bring in homemade snacks for the group.
Then the team decided to have a potluck. I easily could have contributed some gluten-free products from the grocery store, but I felt this was an opportunity to get in the kitchen and make something from scratch for my co-workers.
Knowing that I wasn’t quite ready to dive into gluten-free baking, I opted for a simple, crowd-pleasing dish – what I call my Festive Fall Bake. It’s a combination of sweet potatoes, butternut squash and apples, splashed with some orange juice and baked until fork tender. Before preparing any food, I cleaned all the surfaces in my kitchen and thoroughly washed any bowls or utensils that I planned to use. I washed the baking dish and lined it with aluminum foil, just to make sure there would be no risk of gluten residue. As soon as it was done, I covered the dish with aluminum foil and stashed it on the top shelf of our fridge.
The next day, the staff raved about my Festive Fall Bake. Best of all, I was confident that I had made the food safely. Everyone enjoyed, and no one got sick.

Vegetable Spring Rolls – One of the gluten-free recipes in our “Cook for Your Love” campaign
My gluten-free cooking skills have become more and more helpful over the years, and it now hits even closer to home. Recently, one of my soon-to-be in-laws learned he has to avoid gluten for health reasons. When he came to dinner at our home, we served cheese and gluten-free crackers for appetizers; pork with mole sauce, roasted asparagus and homemade gluten-free cornbread for the main course; and ice cream with a gluten-free crumble for dessert. It was important to me that he got to enjoy the same complete meal as everyone else – no exclusions.
This month at NFCA, we’ve been hosting the “Cook for Your Love” campaign. It stems from our belief that everyone deserves a home-cooked meal, no matter what their dietary restrictions may be. You’re probably used to cooking your own gluten-free food each night, but every now and then you should be able to have someone else cook for you. So, this Valentine’s Day (or any day, really), take the opportunity to cook with a special someone and teach the ins and outs of gluten-free safety. It could be your mom, or your kids, or your best friend. Chances are, they’ll be eager to learn, and it could give them the confidence to cook gluten-free meals more often.
The gluten-free recipes on our “Cook for Your Love” campaign should be enticing enough to get your special someone in the kitchen, but if you need extra encouragement, sign up for the weekly giveaway. Nothing says “try me” like free products, right?
Has a special someone cooked a delicious gluten-free meal for you? Tell us about it (and include recipe links if you have them)!
– Cheryl
5 Tips to Get Out of a Food Rut
[Diane Eblin is a Certified Health Coach who helps her clients achieve easy, healthy gluten-free living. She is also a professional recipe developer, author of The Gluten-Free Diner e-cookbook and founder of The WHOLE Gang. Diane and her entire family, including her dog, all live gluten-free, so we asked her for tips on keeping meals fresh and fun.]
I’m sure you’ve heard the saying “I’m in a food rut.” What does that really mean? Well, the definition of a rut is a settled or established pattern, habit or course of action, especially a boring one. You know – the daily grind, same old stuff, the same meals over and over, yada yada yada.
So, if you’re in a food rut, how do you get out of it? Well, the simplest answer is to eat something different.
Before you punch me for such a lame suggestion, I’m going to give you 5 tips on exactly how to do just that.

Diane Eblin of The WHOLE Gang
1. Use Real Food Ingredients
This is the No. 1 most important tip for staying out of a food rut. Use single ingredient foods, whole foods or real foods. They are naturally gluten-free, have no labels, and are in the produce, meat and seafood sections of the grocery store. If you keep making meals out of a box, you’ll keep making the same meal. If you don’t believe me, Google “chicken recipes” and you’ll get back 77,000,000 results. They call for chicken, not chicken in a box.
Using real food ingredients will save you lots of money. You can purchase those organic meats on sale, in bulk and, for beef, choose those less expensive cuts that take longer to cook. Pull out that crockpot and let it cook while you sleep. Then portion out the meats, freeze what you’re not eating now, and you’re ready to make a few of those millions of recipe results you just Googled.
2. Be Inspired
There are so many inspirational resources for recipes and ideas for your meals. The list includes wonderful cookbooks, both gluten-free and not, along with websites, magazines and cooking shows. You can even work with a health coach to both inspire and inform you. Not a food magazine junkie? Then just take a look at the covers to see what the latest and greatest food trends are out there. If you like what you see, get the magazine and the recipe. Learn how to substitute non-gluten-free ingredients with ones that fit your diet. This way, you can grab any recipe and start cooking!

3. Menu Planning
Get out of your rut by planning a weekly menu so you’ll have the ingredients on hand to make unique meals and know what you’re doing with them. Without a plan, you’ll end up grabbing the same old thing, which you’re already bored with and tired of making. It only takes 15 to 20 minutes to plan out your week and another 15 to 20 minutes to plan out the whole month. Use the resources mentioned above for creative ideas and recipes. I like to start with an inventory of what I have on hand so I can build that into the menu and save money. I often end up with more than a week’s worth of ideas. Make a multi-week menu to keep those good ideas from going to waste.
4. Variety is the Spice of Life
If you’ve never compared ethnic recipes side by side, you might be surprised to learn that there are common ingredients that span the world. What changes are the spices and herbs used, which change the flavor profile of each dish. For instance, let’s take a simple chicken stew. You can make it Italian with tomatoes, Mexican with cilantro and green chilies, French with white wine, Indian with cardamom, turmeric and coconut milk, Moroccan with raisins, cinnamon and ginger, Greek with olives, and so on. So gather up your spices and travel the world on your dinner plate. My two favorite sources for spices are Penzeys and The Spice House. As with any spice, you must make sure they are gluten-free. These two companies will tell you which ones are not and which ones are gluten-free, as are most.
5. Pre-made Menu Plans
If you have just plain run out of ideas and nothing is inspiring you, then you can use a menu planning service or you can visit the many blogs that post weekly menu plans and use theirs. For instance, on my website you can search on Menu Plan Monday and find many weekly menus or Monthly Menu Plan and have your whole month planned out. A few of my favorite sites sharing menus include Celiacs in the House, Adventures of a Gluten-Free Mom, and Celiac Family. If you use a menu planning service, you can have the menu plan, recipes and shopping list all created for you on a weekly basis.
So, if you are in a food rut, grab some new sources of inspiration, plan out your menu, shop for real food ingredients and spices and get cooking. You can have a different meal every day of the year!
– Diane Eblin, CHC, AADP
5 Tips for Baking Gluten-Free From Scratch
[You’re ready to bake from scratch, but don’t know where to start. Fear not! Shauna James Ahern, better known as Gluten-Free Girl, is here to share her tips and tricks for baking delicious gluten-free goods.]
1. Let go of your expectations.
2. You have to combine flours.

3. Learn to bake by weight.
4. Play.
5. Psst! Here’s a secret. Most baked goods are actually better without gluten.
Gluten-Free Cookies in 5 Simple Steps
[If you’re new to the gluten-free diet, you probably have yet to try gluten-free baking. (Yes, we all know xanthan gum bears a rather intimidating name.) Fortunately, there’s a little wonder known as gluten-free cake mix that can do much of the work for you.
Anne Byrn, better known as The Cake Mix Doctor, discovered just how versatile gluten-free cake mix can be when she was creating recipes for her first gluten-free cookbook. We hope her story, and her simple 5-step recipe, will inspire you, too!]
While working on The Cake Mix Doctor Bakes Gluten-Free, I was making gingerbread out of a yellow gluten-free cake mix, adding apple cider, molasses, cocoa powder, ginger, nearly the kitchen sink! The taste of that gingerbread reminded me of my grandmother’s gingersnap cookies, and all of the sudden the most wonderful and nostalgic flashback came into my mind. I was 12 years old and in my grandmother’s kitchen snatching a cookie from the cooling rack.
So, I thought, could I turn this gingerbread recipe into a cookie? I grabbed a clean mixing bowl and wooden spoon, poured a fresh box of cake mix into the bowl and carefully added just one egg, vegetable shortening, molasses, ginger, and other spices. Dropped onto baking sheets, these cookies baked up crisp and spiced with ginger.
There is something unexpected and magical about rice flour and what it does to cookies. Rice flour makes it possible for you to turn a gluten-free cake mix into light, crisp cookies. And because it is flavorless, it is a blank canvas allowing big, bold flavors such as ginger to come through.
-Anne Byrn

Gluten-Free Gingersnaps
(From The Cake Mix Doctor Bakes Gluten-Free, by Anne Byrn)
Makes 2 dozen cookies.
Prep: 10 minutes
Chill: At least 2 hours
Bake: 9 to 11 minutes
Cool: 10 to 16 minutes
Ingredients:
- ¼ cup molasses
- ¼ cup vegetable shortening
- 1 teaspoon pure vanilla extract
- 1 large egg
- 1 package (15 oz.) yellow gluten-free cake mix
- 1 teaspoon ground ginger
- ½ teaspoon ground cinnamon
- ¼ teaspoon ground cloves
- 1/3 cup granulated sugar
Directions:
- Place the molasses, vegetable shortening, and vanilla in a large mixing bowl and beat with an electric mixer on low speed until just combined, 30 seconds. Stop the machine and scrape down the side of the bowl with a rubber spatula. Add the egg. Increase the mixer to medium and beat until smooth, 30 seconds. Set the molasses mixture aside.
- Place the cake mix, ginger, cinnamon and cloves in a small bowl and stir to combine. Add the cake mix mixture to the molasses mixture, a little at a time, beating on low speed until everything is just combined, 30 to 45 seconds. Cover the bowl with plastic wrap and place the cookie dough in the refrigerator to chill for 2 hours or overnight.
- Place a rack in the center of the oven and preheat the oven to 350 degrees F. Set aside 2 ungreased baking sheets.
- Place the sugar in a shallow bowl. Form the cookie dough into generous 1-inch balls. Roll the balls of dough in the sugar and arrange them on the baking sheets, about 4 inches apart.
- Place the baking sheets in the oven and bake the cookies until they are crisp around the edges, 9 to 11 minutes. Transfer the baking sheets to wire racks and let the cookies cool for 1 minute. Using a metal spatula, transfer the cookies to wire racks to cool completely, 10 to 15 minutes longer. Repeat with the remaining cookie dough, if any.

